HOW TO INSTALL A TENT STOVE JACK VIDEO
Full length, step by step video guide to installing a tent stove jack in a canvas tent.

Assemble all of your tools and materials. You will need a quality canvas tent, sharp knife, 2 adjustable wrenches, pencil, tent stove and flue pipe system, and a tent stove jack or flashing. Having a second pair of hands to help is useful but you can DIY if you need to! Brand new tent stoves should be seasoned before use by assembling it completely and letting it burn for several hours outside to remove any oils or chemicals left over from the manufacturing process. Seasoning is also called off-gassing and it can be stinky depending on the stove material.


Proper tent stove placement is dependent on your environment, your stove, and your desired temperature differential. Placing your stove closer to the center of the tent will maximize heat transfer by keeping a larger portion of the hot flue pipe inside the tent. Center placement is ideal for extremely cold temperatures, large tents, and small fireboxes. Tent stoves that are placed closer to the side wall of the tent will capture less heat but are easier to work around and refuel while keeping your tent clean.
Make sure you use a modular stove jack like the Exit 1 so you can choose the perfect location for your stove and get a nice tight fit around your flue pipe. Tents with pre-installed stove jacks may sound convenient but they do not fit most stoves and do not allow you to customize your stove placement. Use a knife to cut the galvanized rubber flashing to fit snugly around your flue pipe section. Next disassemble your stove jack completely - you will use the rings as a stencil in the next step.

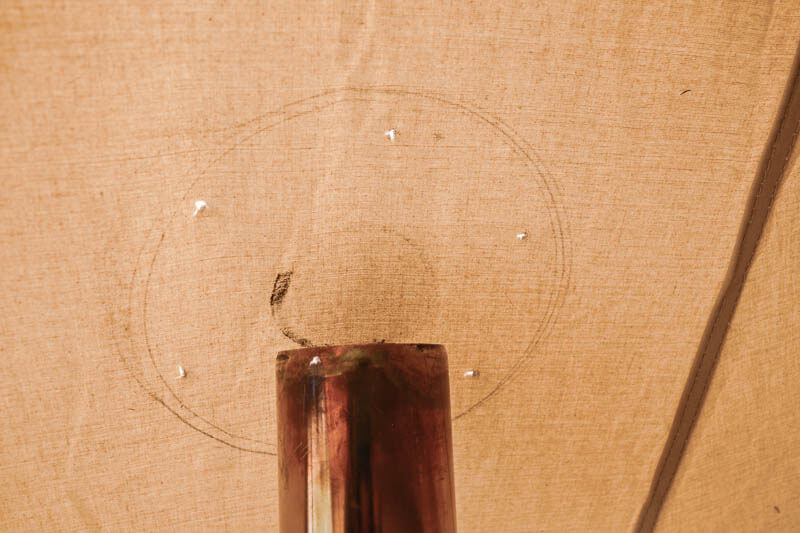
Line up a flue pipe section above your chosen stove placement and mark the exit point. Center the metal ring around the flue pipe exit point and use the ring as a stencil to pencil in the location of the bolt holes. Poke small holes through the canvas with the tip of a sharp knife to allow the bolts to pass through. You do not need to cut out a hole for the flue pipe just yet -- you'll do that later.
From the outside of the tent line up the outer metal ring and stove jack with your bolt holes. Press the bolts through the holes in the canvas. Now from the inside of the tent add the second metal ring and screw the nuts onto the bolts. The canvas should be sandwiched tightly between the two rings. Use your wrenches to hold the bolt still while tightening the nuts. The seal between the two rings should be as tight as possible – this will keep rain and mold from leaking through the jack. For long term use you can use silicone, wax, or hot glue to add an extra layer of protection around the outside of the rings. Once your jack is secure you can cut a hole in the canvas for the flue pipe.


Add your flue pipe sections to complete the assembly of your stove and light it up! Learn more about how to light a tent stove in our Tent Stove Buyers Guide.
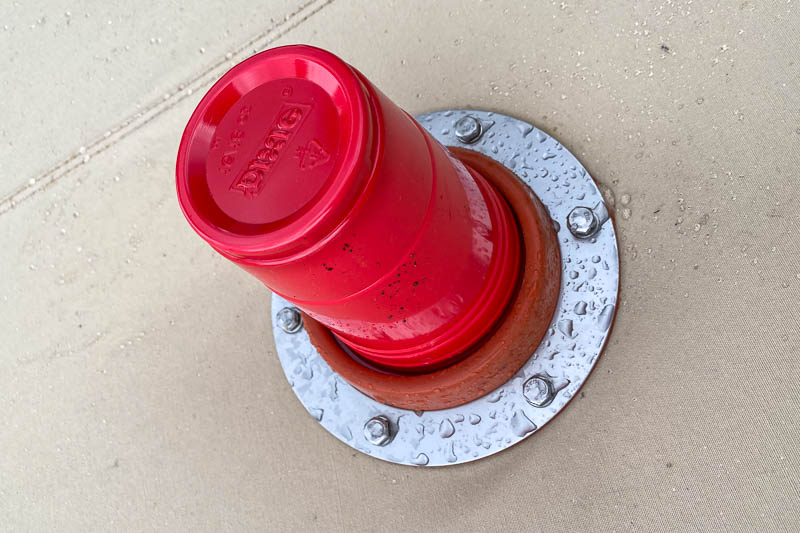
Sealing up your stove jack when you're not using your tent stove is easy. As a temporary solution on short trips the best way to quickly and easily seal up your stove jack is to stick a plastic cup into the stove jack. The classic red Solo cup works great. For a longer term seal you can disassemble the stove jack and install the stove jack cover plate included with 2022 Exit I stove jacks.
Learn more about tent stoves in our Tent Stove Buyers Guide: The Complete Guide to Buying, Owning, and Operating a Portable Wood Burning Tent Stove.